One of my projects included building a single page web application with Vue.js. As the Go Live approached, the topic of performance optimization became more relevant. In this article I have collected everything I have learned about improving the performance of Vue.js applications with regards to loading times and rendering performance.
With Vue.js you are able to quickly build a Single Page application.
Webpack will bundle everything into files (HTML, JavaScript, CSS) for you and finally you can serve it with nginx. At least this is our setup.
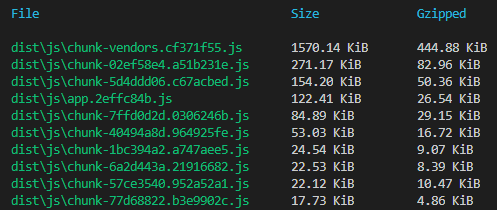
Eventually, Webpack will warn you that some assets have gotten too big.

It is important to note that these three files will be loaded once the user visits the SPA and only afterwards the page is rendered.
However, most of the files contents is not even needed for the initially loaded page and should not block the user from using our website as quickly as possible.
The following article presents several approaches how you can mitigate this issue and further approaches to improve your Vue.js application in terms of responsiveness and performance.
Functional Components
Functional components are components which hold no state and no instance.
Turning your stateless Vue component into a functional component can drastically increase your rendering performance.
Simply add the functional keyword to the top-level template tag:
<template functional>
  <div>...</div>
</template>
To access your props and data as before, you have to make some minor adjustments.
<template functional>
  <div>{{ props.someProp }}</div>
</template>

<script>
export default {
  props: {
    someProp: String
  }
}
</script>
In case you are using i18n for internalization, you have to prepend parent to $t:
{{ parent.$t('app.not-found.message') }}With functional components, we do not have access to methods or computed props. However, we can still access methods using $options.
<template functional>
  <div>{{ $options.username(props.user) }}</div>
</template>

<script lang="ts">
export default {
  props: {
    user: User,
  },

  username(user: User): string {
    return user.name;
  }
}
</script>
Lazy-Load Components
Lazy loading components can save a lot of time on initial download. Any lazily loaded resource is downloaded when it’s import() function is invoked.
In case of Vue components that happens only when it is requested to render.
Dialogues, components in tabs and pretty much everything which is only shown conditially is predestined for this. These components are usually shown only after a user interaction.
<template>
  <div>
     ...
    <app-modal-dialog v-if="showDialog" />
  </div>
</template>

<script>
export default {
  components: {
    ModalDialog: () => import('./ModalDialog.vue')
  }
}
</script>
Webpack will create a seperate chunk for the ModalDialog component which will not be downloaded immediately on page load but only once it is needed.
Be careful not to lazy-load a component which should be shown automatically.
For example, the following would (silently) fail to load the modal dialog.
mounted() {
    this.$bvModal.show('password-check');
},
The reason is that the mounted hook is evaluated before the modal component is lazy loaded.
Lazy-Load Routes
When building single-page apps, the JavaScript bundle can become quite large, and thus increase the page load time.
It would be more efficient, if we can split each route’s components into a separate chunk, and only load them once the route is visited.
import ProjectList from '@/components/ProjectList.vue';

export const routes = [
  {
    path: '/projects',
    name: 'projects',
    component: ProjectList,
  },
]
It is very easy to define an async component that will be automatically code-split by Webpack. Just change the import statement:
const ProjectList = () => import('@/components/ProjectList.vue');Apart from that nothing needs to change in the route configuration.
Build your app in production mode with
"build": "vue-cli-service build --mode production"Open your console and verify that a lot of chunks were generated.
You can also verify that this is working by opening the developer console in your browser. Go to the Network tab.
There you can see how several JavaScript files will be loaded asynchronously once you visit a new route.
In develop mode, each chunk will be given an auto-incremented number. In production mode, a automatically calculated hash value will be used instead.

A very cool feature is that Vue automatically adds magic comments for Webpack so that further chunks will be prefetched automatically (see prefetch cache).
However, prefetching will only start after the browser has finished the initial load and becomes idle.
Make Object Lists Immutable
Usually, we will fetch a list of objects from a backend, for example users, items, articles, etc.
By default, Vue makes every first-level property for each object in the array reactive. That can be expensive for large arrays of objects.
Sometimes, we do not need to modify them when we just want to display objects.
So, in these cases, we can gain some performance if we prevent Vue from making the list reactive.
By using Object.freeze on the list, we are making it immutable.
export async function get(url: string): Promise<User[]> {
   const response = await Object.freeze(axios.get<User[]>(url));
   return response.data;
}
Measure Runtime Performance
We have talked about quite a few ways to improve a Vue SPA but we do not know how much performance we actually have gained.
We can do so by using the Performance tab in our browser’s Developer Tools.
In order to have accurate data, we have to activate the performance mode in our Vue app.
Let us activate it for developer mode in our main.ts file with
Vue.config.performance = process.env.NODE_ENV !== "production";This activates the User Timing API that Vue uses internally to measure the components performance.
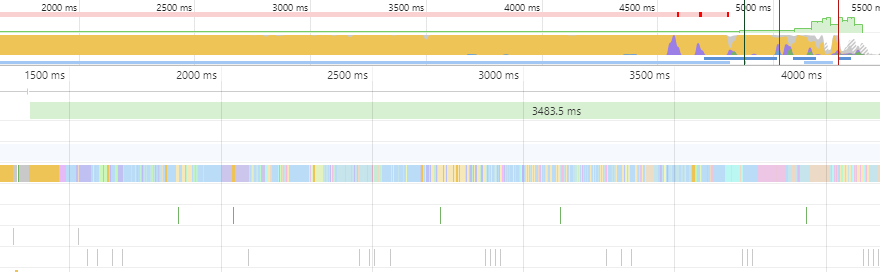
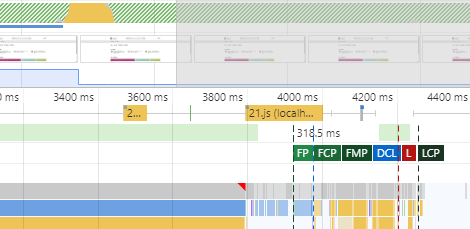
Open your browser and press F12 to open the Developer Console. Switch to the Performance tab and click Start Profiling.

In Chrome, the Timings row shows important marks, such as the Time of First Contentful Paint and First Meaningful Paint.
These are measures you should try to decrease so that your users can use the website as fast as possible.
Another great tool from Google is PageSpeed Insights. Type in your domain name and hit enter. After some seconds, it will output a summary of your site’s performance and suggest actions to take.
Summary
Do you have more tips and tricks to improve the perfomance of Vue.js applications? Let me know in the comments!
In this part, we have seen how we can use lazy-loading for routes and components to split our single page app into chunks, how functional components can improve the performance and how we can measure these improvements.
In the second part, we will drastically reduce our bundle size.