When you develop a backend, at some point you always come to the point that you have to explain its interface to other developers. With go-swagger and SwaggerUI we can automatically create an interactive, well-structured API documentation. This blog post shows how to annotate a Golang REST API and create a Swagger specification from it.
A Swagger specification describes the public interfaces of the API and is independent of the programming language.
We will be annotating our Golang API in the code itself.
From that, we will use Go-Swagger to generate a Swagger 2.0 specification file.
This file can be served with SwaggerUI as an interactive documentation of your API.
Installing Go-Swagger
Go to https://github.com/go-swagger/go-swagger/releases and download the latest released version.
Put the executable somewhere you like and add its location to your sytem’s PATH.
I have put it to %GOPATH%/bin/, that is where all other go tools reside.
API Description with swagger:meta
First, we want to provide some metadata for our API, e.g. general description, the version, contact person, security definitions, and so on.
Create a doc.go file on the root level.
Assign it to the main package and add the swagger:meta annotation.
An example can be found below. Besides the mentioned metadata, you will find more in the official swagger:meta documentation.
// Golang Microservice API
//
// Example Swagger spec.
//
//	Schemes: [http, https]
//	BasePath: /
//	Version: 0.0.1
//	Contact: Matthias Sommer<admin@matthiassommer.it>
//
//	Consumes:
//	- application/json
//
//	Produces:
//	- application/json
//
//      SecurityDefinitions:
//          api_key:
//              type: apiKey
//              name: Authorization
//              in: header
// swagger:meta
package main- Title – Short textual caption
- Description – Textual description
- Schemes – List of accepted schemes
- BasePath – The default base path of the API (prefix to all routes)
- Version – current API version
- Contact – person to contact (name, email, and url)
- Consumes – list of default mime types for the content the API receives
- Produces – list of default mime types for the content the API sends
- SecurityDefinitions – list of supported authorization types (Oauth, basic or apiKey)
Specifying the accepted schemes and consumption/production mime types on a global level allows us to omit them from the endpoints themselves. Nevertheless, variations in an endpoint can be specified differently, so the global value is overwritten.
When a SecurityDefinition is given, Swagger UI displays an extra button for authorization.
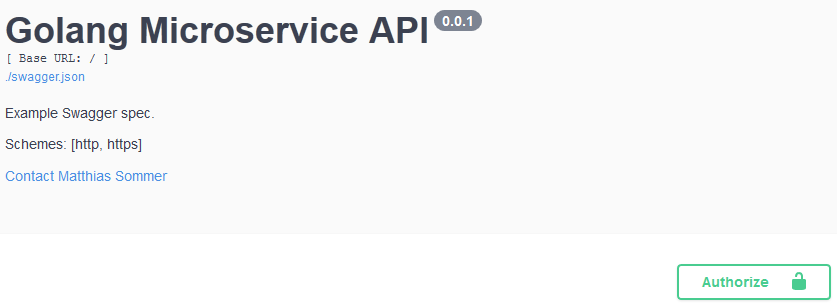
The resulting specification looks like this in Swagger UI:
Generate the Swagger Specification
Before we move on, let’s generate the Swagger specification file with
%GOPATH%/bin/go-swagger generate spec -o ./swagger.jsonYou can also create a yml file instead of json. For a full list of command options, go to https://goswagger.io/generate/spec.html.
Serve API Documentation Page
Go-swagger has a command to serve the generated json document:
%GOPATH%/bin/go-swagger serve ./swagger.jsonThis hosts the specification on your own machine and opens a new tab in your browser with Redoc (http://localhost:57396/docs).
Alternatively, add the -F=swagger parameter to host and open it in Swagger UI instead (http://petstore.swagger.io/).
%GOPATH%/bin/go-swagger serve -F swagger ./swagger.jsonDocument API Endpoints
Now that we have done the preliminary work, we can start documenting the endpoints of the API. For this, we will use the swagger:operation annotation.
I will explain the details using some concrete examples. I use Echo as my HTTP router, by the way.
Simple endpoint: Health
The first simple example is a health endpoint. It simply returns status code 204 in case the service is running.
// Health returns OK to indicate a running service
func (router *Router) Health(c echo.Context) error {
	return c.NoContent(http.StatusNoContent)
}
This endpoint is annotated as follows:
// swagger:operation GET /health general Health
// Check if the service is running.
// Returns 204 without content
// ---
// responses:
//     '204':
//         description: Service available
router.echo.GET("/health", router.Health)
Here, we have a GET endpoint which can be called at <basepath>/health.
It has a title (second line – sentence must end with a dot) and description (third line). After --- the response type is defined with its status code and a mandatory description.
Complex endpoint: Authentication
The second endpoint expects the user’s username and password and returns an Oauth2 token to the user.
// swagger:operation POST /oauth/token auth GetToken
// Authenticate and authorise with Windows credentials.
// ---
// produces:
// - application/json
// parameters:
// - name: grant_type
//   in: formData
//   description: Grant type
//   required: true
//   type: string
//   default: "password"
// - name: username
//   in: formData
//   description: domain\username
//   type: string
//   required: true
// - name: password
//   in: formData
//   description: Your password
//   required: true
//   type: string
//   format: password
// responses:
//     '200':
//         description: Authenticated
//     '400':
//         description: Bad request
//     '500':
//         description: Internal server error
router.echo.POST("/oauth/token", auth.login)- swagger:operation – Annotation [method] [path] [?tags] [operationId]
- POST – HTTP method type
- /oauth/token – endpoint path (without base path)
- auth – using a tag to group the operation
- GetToken – unique operation ID
- Next comes a short textual description of the endpoint
- The section following
---defines the Swagger spec in yaml notation. Go swagger will not parse it if your intendation is not correct. Use tabs or four spaces (see responses). - parameters – list of input parameters. Each parameter has a name, value type, location type, and an optional description
- responses – list of HTTP status codes and a description
I would like to emphasise a few more points.
You can use the default keyword to prefill the Swagger UI input with a default value (e.g. default: "password"). If you want to set a fixed value which cannot be changed in the UI, use the following:
// - name: grant_type
//   in: formData
//   description: Grant type
//   required: true
//   type: string
//   enum: ["password"]
By default, all parameters are optional. A mandatory field can be set with required: true.

Summary
This concludes the first part of this series.
In this blogpost we have seen how to create API documentation using go-swagger and Swagger UI for a Golang API.