
It takes seconds for the first meaningful paint while your website visitors are looking at a white browser window as you are shipping way more code than what is needed to render the page. We had exactly these issue in one of my latest projects. Here is how we could drastically reduce our bundle size.
Analyze Your Bundle
You are concerned about your bundle size. But before we can optimise our bundle, we have to locate the problems.
I am using Webpack Bundle Analyzer.
That is a Webpack plugin that represents your bundle content as tree map.
# NPM
npm install --save-dev webpack-bundle-analyzer
# Yarn
yarn add -D webpack-bundle-analyzer
Modify you vue.config.js to require the BundleAnalyzerPlugin and add it as plugin.
const BundleAnalyzerPlugin = require("webpack-bundle-analyzer").BundleAnalyzerPlugin;

module.exports = {
  configureWebpack: {
    plugins: [
      new BundleAnalyzerPlugin(),
    ],
  },
  productionSourceMap: false,
};
Once your build or serve your app, the plugin will be executed.
It will create an visualization of the contents of your bundles.

Another helpful tool is Webpack bundle optimizer, an online analyzer. Build your SPA in production mode and redirect its output to a json file.
"build": "vue-cli-service build --mode production --profile --json > stats.json",Upload the resulting stats.json to the website.
The optimizer will give you an overview of your bundle and output suggestions on how to reduce your bundle size.
Upload your package.json to Bundlephobia to see how much a package adds to your bundle in terms of size and download time.
Strip Out Unused CSS
When you are building a website, you might decide to use a framework like Bootstrap but you will only use a small set of the framework, and a lot of unused CSS styles will be included.
PurgeCSS is a tool that removes unused CSS by applying string comparison.
Install it as development dependency:
npm -D @fullhuman/purgecssI’m using it as a postcss plugin. So I have a postcss.config.js file with this content:
const IN_PRODUCTION = process.env.NODE_ENV === "production";

const purgecss = require("@fullhuman/postcss-purgecss");

module.exports = {
  plugins: [
    require("autoprefixer"),
    IN_PRODUCTION && purgecss({
      content: [`./public/index.html`, `./src/components/**/*.vue`, `./src/app.vue`],
      defaultExtractor(content) {
        const contentWithoutStyleBlocks = content.replace(/<style[^]+?<\/style>/gi, "");
        return contentWithoutStyleBlocks.match(/[A-Za-z0-9-_/:]*[A-Za-z0-9-_/]+/g) || [];
      },
      fontFace: true,
      keyframes: true,
      variables: true,
      whitelist: [],
      whitelistPatterns: [/-(leave|enter|appear)(|-(to|from|active))$/, /^(?!(|.*?:)cursor-move).+-move$/, /^router-link(|-exact)-active$/, /data-v-.*/],
      whitelistPatternsChildren: [/^toast/, /^b-toast/],
    }),
  ],
};
All you need to do is to modify the content section to the folder where your components are located.
I use a custom extractor so that PurgeCSS understands to look into Vue’s <style> section for CSS code.
You can whitelist selectors to stop PurgeCSS from removing them from your CSS with the PurgeCSS options whitelist, whitelistPatterns, whitelistPatternsChildren.
For example, PurgeCSS would accidently throw away the CSS classes for the Bootstrap Vue Toast as I create it dynamically with this.$bvToast.toast. The regular expressions in whitelistPatternsChildren tell PurgeCSS to keep these selectors and their childrens.
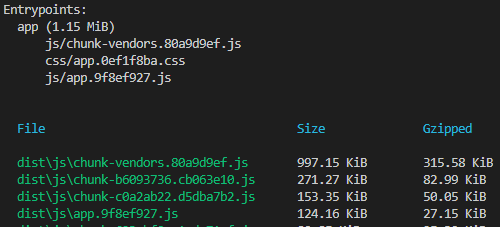
And here are the results.
Before:

After:
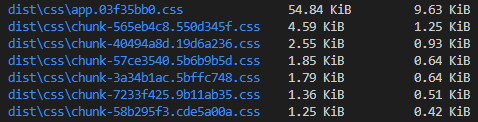
The size reduction after minification is quite impressive. We have reduced the CSS chunk sizes from around 313kb (gzip: 46kb) to only 67kb (gzip: 14kb)!
PurgeCSS provides a comparison to other CSS minifiers, such as UnCSS, listing their pros and cons.
Reduce Import Sizes of Dependencies
To reduce the import size of your Lodash imports with tree-shaking support use
import debounce from 'lodash/debounce';instead of named imports such as
import { debounce } from 'lodash';Another often used library is Bootstrap Vue. Their documentation tells you to include it by
import Vue from 'vue'
import { BootstrapVue, IconsPlugin } from 'bootstrap-vue'
Vue.use(BootstrapVue)
// Optionally install the BootstrapVue icon components plugin
Vue.use(IconsPlugin)
However, this will register the whole library globally to your entrypoint JavaScript chunk.
Instead, you should only include specific components where you need them by
import { BTable } from 'bootstrap-vue';
import Vue from 'vue';
Vue.component('b-table', BTable);
Thereby, the code is added to the respective component’s chunk, reducing the main vendor chunk size.
The same applies to the Bootstrap Vue icons. Do not import them globally but locally with Vue.component.
//main.ts
import { BIcon} from 'bootstrap-vue';
Vue.component('BIcon', BIcon);

// component.ts
import { BIconDash, BIconPlus, BIconStarFill } from 'bootstrap-vue';

components: {
    AppModalDialog: () => import('@/components/shared/AppModalDialog.vue'),
    BIconStarFill,
    BIconDash,
    BIconPlus,
},
Reduce Image Sizes
Compress your SVGs with https://jakearchibald.github.io/svgomg/.
For jpg and png images use https://imagecompressor.com/.
Summary
Finally, after all these improvements of part 1 and 2, I ended up with a great reduction of my entrypoint bundles.
However, their is still room for improvement. For example, lazy loading Vuex modules could further reduce the initial bundle.
Write in the comments how much you could reduce your bundle with these tips.
Having further tips? Let me know in the comments.
Also try out these tips to speed-up your single page application.