In a recent project, we set up a CI/CD pipeline with Bitbucket, Jenkins, and Openshift. Releases of the frontend and microservices should only be done manually, so we decided to implement a Jenkins job where the developer selects the service and its version to be released in Openshift.
This article covers how we set up Jenkins for deployment to Openshift and explains the according Jenkinsfile.
Our CI/CD pipeline uses state-of-the-art approaches, such as multibranch pipelines in Jenkins and Docker images hosted in Openshift.
Merges of pull request to the develop branch are automatically deployed to the develop instance in Openshift.
A script is used to create branches for release candidates where hotfixes are integrated.
Roll-outs to production should also be done manually. Therefore, we created a simple parametrised Jenkins job where the developer selects the service, the image tag, and the target environment to deploy to.
The job tags the already existing image with “production” and Openshift will pick up the change and deploy it.
Jenkins Setup with Openshift
Open Jenkins and go to Manage Jenkins -> Manage Plugins. Install the OpenShift Jenkins Pipeline (DSL) Plugin. This will be needed to interact with an OpenShift API Server.

In Jenkins, create a new pipeline under “Create element -> Pipeline”.
Next, configure your new pipeline job. Check “this build is parametrized” and enter the parameters as defined here.

Click on save and go to “Build with parameters”.
You will see some input fields which match the configuration for the parametrised job.
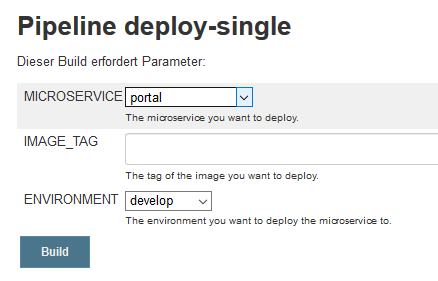
Jenkins Pipeline Script
properties([
     parameters([
        string(name: 'SERVICE', description: 'The name of the service you want to deploy.'),
        string(name: 'IMAGE_TAG', defaultValue: 'develop', description: 'The tag of the image you want to deploy.'),
        choice(name: 'ENVIRONMENT', choices: ['develop', 'staging', 'production'], description: 'Target environment you want to deploy to.')
     ])
])

node {
    def deploySuccessful = true
    try {
	stage ('Checkout') {
		checkout scm
	}

	def imageToDeploy = "${params.SERVICE}:${params.IMAGE_TAG}"
	print "Deploying ${imageToDeploy} to ${params.ENVIRONMENT}"

	stage ('Tag Image For Deployment') {
		openshift.withCluster() { // Use "default" cluster or fallback to OpenShift cluster detection
                    openshift.withProject('another-project') { // select namespace
		       openshift.tag("${imageToDeploy}", "${params.SERVICE}:${params.ENVIRONMENT}")
                    }
		}
	}
    } catch (e) {
        deploySuccessful = false
        throw e
    } finally {
	// send mail
    }
}
The first part of the Jenkinsfile defines the parameters.
The developer enters the name of the service, its image tag (such as latest, develop, or any other Openshift tag), and selects one of the target environments (e.g. develop, staging or production).
As you can see, this job is not restricted to rollout releases from the staging to the production environment.
For example, it could also be used to deploy a feature branch to the development instance for testing purposes.
The second part defines the pipeline stages.
First, we check out the code from the Git repository.
We then call the Openshift cluster by openshift.withCluster() and select the project with openshift.withProject().
Using withCluster() without parameter is working as our Jenkins is also running inside Openshift itself. We could also leave out the withProject() call alltogether in case we want to tag an image which is located in the same project as where Jenkins is running. Otherwise, you have to pass the cluster name and project as properties.
We then add a new tag to the given image with openshift.tag(image, tag). The format of both method parameters is "namespace/imagename:version".
The build config in Openshift is configure so that it reacts on image stream changes.
The newly tagged image is thereby deployed automatically to the productive instance.